- Navigation
- Home
- System Requirements
- Data Services API
- FIMMAS
- Terms and Conventions
- More Links
- API Specification
Installation
Extract the Data Services API Archive
The first step of the installation is to extract the FIMMAS Data Services
API archive onto the server. The archive is delivered as part of a
FIMMAS release. The recommended locations are C:\Program Files on
Windows, and /opt on Linux. The naming convention we recommend for the
installation directory is FIMMAS Data Services API xxx, where xxx is
substituted for the FIMMAS database the API is expected to connect with.
This naming convention is not required, but is recommended, and will be used
throughout this documentation.
Windows Example:
C:\Program Files\FIMMAS Data Services API DEVC:\Program Files\FIMMAS Data Services API MDLC:\Program Files\FIMMAS Data Services API PRD
Linux Example:
/opt/fimmas-data-services-api-dev/opt/fimmas-data-services-api-mdl/opt/fimmas-data-services-api-prd
This is an example of what the archive contains for a Windows installation.

The archive contains the following items:
| Windows | Linux | Description |
|---|---|---|
| data-services-api.exe | data-services-api | The Data Services API executable |
| config.toml.example | config.toml.example | An example of the configuration options available for the API |
| CHANGELOG.md | CHANGELOG.md | A list of the changes by release |
| README.md | README.md | May contain important information |
| service.exe | A wrapper executable that can be used to host any executable as a Windows service | |
| service.xml | Additional configuration settings for service.exe | |
| service.exe.config | Additional configuration settings for service.exe |
Configure the FIMMAS Data Services API
The Configuration settings for the FIMMAS Data Services API are stored in a file called config.toml. This file does not exist for new installations, but an Example configuration file is shipped as config.toml.example. A TOML file is a configuration file format that is easy to read, with various section headings that appear in [brackets]; comment lines are preceeded by # characters.
To create a new configuration file, copy and paste config.toml.example; renaming the file to config.toml.
Sections
There are three sections that need to be reviewed in this file:
[api]
| Setting Name | Type | Example | Description |
|---|---|---|---|
| port | integer | 9001 |
the port you want the API to listen on |
| debug | boolean | false, true |
print extra debug output, like the contents of API requests |
| sslcert | string | "cert.crt" |
The SSL certificate the API will use. If both this and sslkey are set, the API will use HTTPS instead of HTTP. |
| sslkey | string | "cert.key" |
The SSL key the API will use. If both this and sslcert are set, the API will use HTTPS instead of HTTP. |
| host | string | "api.example.com:9001" |
The ‘host’ header for the Web Portal application security settings |
| commonpath | string | \\\\servername\\sharename |
A shared file path for uploads that the API and FIMMAS can both access |
[appx]
| Setting Name | Type | Example | Description |
|---|---|---|---|
| host | string | "appx.example.com" |
The host of your FIMMAS server |
| port | integer | 8061 |
The port your data login manager is listening on |
| username | string | "apiuser" |
The FIMMAS user the API will log in as |
| password | string | "apipassword" |
The password for the above user |
| passwordkey | string | "0cb5ef84e39fc01b..." |
If you choose to encrypt your APPX password, this will be used as the decryption key. Must be a 64 character (256 bit) hex string. See the encrypt command for more details. |
[webportal]
localhost and any port that is
not bound.| Setting Name | Type | Example | Description |
|---|---|---|---|
| host | string | "http://portal.example.com" |
The host your web portal is running on |
| port | integer | 3009 |
The system port of your web portal |
| trustedcert | string | "cert.pem" |
A certificate you want the API to trust for connections to the web portal. Useful if you are using a self-signed certificate. |
| skipverification | boolean | false |
Skip SSL certificate verification when connecting to the web portal system portal. Not recommended for use in a production environment. |
Configure the Service Settings (Windows)
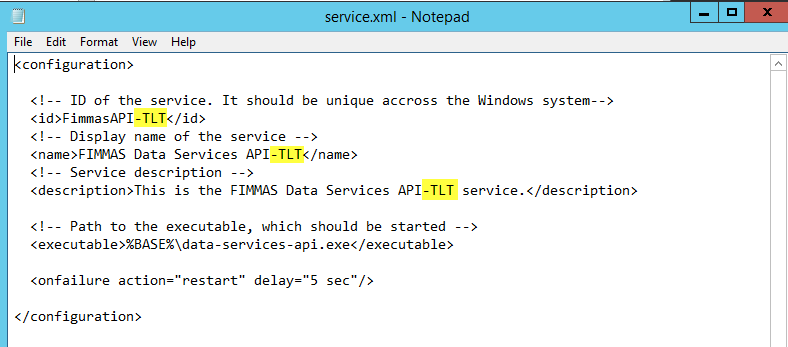
It may be necessary to append the database name to the service ID. If multiple instances of the API are going to be installed on one server, each service needs to have a different ID. In addition, the name can be used to more easily identify which services are running, and which database each service connects to.
The service ID and name can be changed by updating these values in the service.xml file.

Create the System Service
Now that the FIMMAS Data Services API files are installed, the system service can be created.
Windows
Navigate to the installation directory in an adminstrative command prompt. To create the system service, run this command:
service.exe install
Once the service is created, it can be started with this command, or managed from the Windows service manager:
service.exe start
Linux
The FIMMAS Data Services API can be managed with any of the Linux service managers, but the examples here will be focused on systemd and Red Hat Enterprise Linux 7.
This is what a basic systemd unit file would look like, but it will need to be customized to fit your envoironment.
[Unit]
Description=FIMMAS Data Services API XXX
After=network.target

[Service]
Type=simple
ExecStart=/opt/fimmas-data-services-api-xxx/data-services-api
WorkingDirectory=/opt/fimmas-data-services-api-xxx
User=dataservices
Group=dataservices
Restart=always
RestartSec=2
KillSignal=SIGINT

[Install]
WantedBy=multi-user.target
Once you’ve changed the paths and user/group to fit your server, place the
systemd unit file in /etc/systemd/system/fimmas-data-services-api-xxx.service.
To start and enable the service, run these commands:
sudo systemctl daemon-reload
sudo systemctl start fimmas-data-services-api-xxx
sudo systemctl enable fimmas-data-services-api-xxx
- Navigation
- Home
- System Requirements
- Data Services API
- FIMMAS
- Terms and Conventions
- More Links
- API Specification